Okay, it’s finally here. The day you get to bake bread. I’d first like to say that I went the entire day without setting the smoke alarm in my apartment off (which happened 3 times the last time I did this), so I’d already consider that a win.
The first thing to do on Day 3 is preheat your dutch oven that you’ll be baking in. Two good things about a dutch oven is that it holds heat really well and the top helps trap steam so that the crust can remain soft for the first few minutes and the dough can continue to expand as it cooks. If you only baked without the top, the outside would finish cooking before the dough expanded to the ideal size and the inside would be gummy.
Preheat the dutch oven with its top on at 500
{Take one loaf out of the fridge. Flip the dough out from the proofing basket onto the floured and beautifully cut parchment paper and score (make cuts in the top of the dough) the dough in a pattern of your choosing. The best tool for this is a lame (French — pronounced like the first syllable of llama). It looks like this.
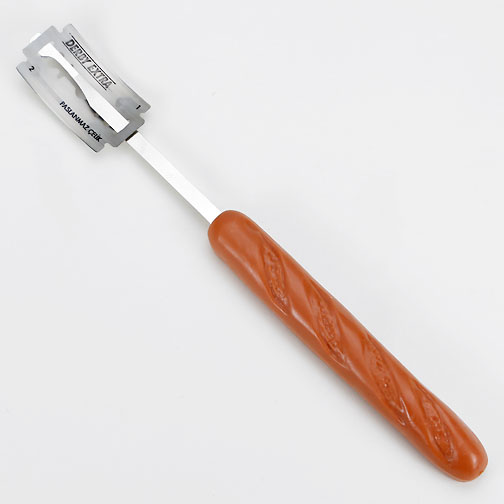
This helps steam escape from the bread and encourages it to rise. The blade is scary sharp so be careful.
Here’s what the scored dough looks like on the parchment paper.

Take the dutch oven out of the oven. Slide the parchment paper with the dough into the dutch oven and put the cover back on.
Put the dutch oven in the oven and bake for 15 minutes with the lid on. After 15 minutes, take the lid off the dutch oven. Bake for an additional 30-40 minutes. The crust should be firm to the touch (but it should also be really hot, so be careful!). The inside of the dough should register 190
[One big inhale…] Take the dutch oven out of the oven and transfer the bread (without the parchment paper) onto a cooling rack. Let the bread cool for a few hours before cutting into. The inside needs time to set to achieve the texture you’re really after!}
Congrats! You just baked a loaf of sourdough bread! Now just repeat everything inside of the {}s for the second loaf. You can experiment with different scoring patterns!
Here are what my loaves looked like today!

I still haven’t quite figured out how to get the sections between the scores to be at different heights (like the inner circle popping up over the outer circle). I think that look cool, but it’s nice to have things to work towards.
I’d like to give an enormous thank you to Brad and Claire at Bon Appetit for the inspiration to do this and for the incredibly helpful video that explained each step of the process!
